What is CIS? A Guide to Implement CIS Controls with PowerShell
In today’s interconnected world, cyber threats have become increasingly sophisticated, making it vital for organizations to adopt effective cybersecurity frameworks. The Center for Internet Security (CIS) provides a set of best practices known as the CIS Controls, designed to protect systems, data, and networks from a range of cyber threats. This blog explains what CIS is, why it’s important, and provides practical steps to implement these controls in your organization using PowerShell scripts.
What is CIS?
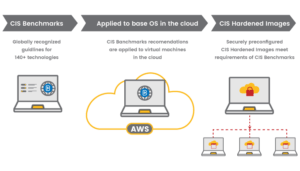
The Center for Internet Security (CIS) is a non-profit organization that works to safeguard private and public organizations from cyber threats by providing globally recognized best practices. The CIS Controls are a prioritized set of actions aimed at mitigating the most prevalent cyber risks.
What are CIS Controls?
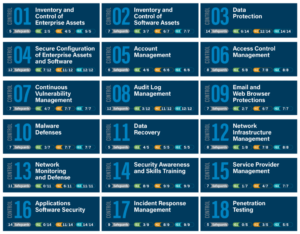
CIS Controls, formerly known as the “SANS Top 20 Security Controls,” consist of 18 action items grouped into three categories:
- Basic Controls: These cover foundational activities for effective cyber hygiene.
- Foundational Controls: These implement more advanced security best practices.
- Organizational Controls: These ensure robust policy and procedural support for security operations.
The idea behind CIS Controls is to prioritize security actions that have the most significant impact in reducing risk. Whether you’re a small business or a large enterprise, CIS Controls can be adapted to your organization’s specific security needs.
How to Implement CIS Controls Using PowerShell
Now that we understand what CIS is, let’s dive into how you can implement CIS Controls in your organization using PowerShell. Below, we’ll go through each control and demonstrate how you can automate key security actions with simple PowerShell commands.
Step-by-Step Guide to Implement CIS Controls with PowerShell
Control 1: Inventory and Control of Hardware Assets
A critical step in securing your organization is knowing what hardware is connected to your network. This ensures that only authorized devices are accessing your resources.
“`powershell
List all hardware information for computers
Get-WmiObject -Class Win32_ComputerSystem | Select-Object Name, Manufacturer, Model, Domain
“`
Control 2: Inventory and Control of Software Assets
Similarly, maintaining an inventory of installed software helps prevent unauthorized or vulnerable applications from running on your network.
“`powershell
List all installed software on the system
Get-WmiObject -Query “SELECT FROM Win32_Product” | Select-Object Name, Version, Vendor
“`
Control 3: Continuous Vulnerability Management
Regularly scanning your network and systems for vulnerabilities is essential for identifying weaknesses that attackers could exploit.
“`powershell
Write-Host “Use tools like Nessus, OpenVAS, or Qualys for automated vulnerability scanning.”
“`
Control 4: Controlled Use of Administrative Privileges
Administrative privileges should be tightly controlled. This command helps you identify users with elevated privileges.
“`powershell
Check members of the Administrators group
Get-LocalGroupMember -Group “Administrators” | Select-Object Name, PrincipalSource
“`
Control 5: Secure Configuration for Hardware and Software
Ensuring secure configurations is a key defense against attacks. For instance, disabling remote desktop can reduce exposure.
“`powershell
Disable Remote Desktop
Set-ItemProperty -Path ‘HKLM:\SYSTEM\CurrentControlSet\Control\Terminal Server\’ -Name “fDenyTSConnections” -Value 1
Write-Host “Remote desktop disabled.”
“`
Control 6: Maintenance, Monitoring, and Analysis of Audit Logs
Audit logs are critical for investigating incidents and identifying suspicious activities. You can enable auditing for various events, such as logins.
“`powershell
Enable security auditing for logon/logoff events
auditpol /set /category:”Logon/Logoff” /success:enable /failure:enable
Write-Host “Security audit log monitoring enabled.”
“`
Control 7: Email and Web Browser Protections
You can implement email and browser protection by controlling browser settings and enforcing policies through Group Policy or PowerShell.
“`powershell
Example of Internet Explorer configuration
Set-ItemProperty -Path ‘HKCU:\Software\Microsoft\Internet Explorer\Main’ -Name “DisableFirstRunCustomize” -Value 1
Write-Host “Basic web browser protections configured.”
“`
Control 8: Malware Defenses
Using built-in tools like Windows Defender, you can ensure real-time protection is enabled for all systems.
“`powershell
Enable Windows Defender real-time protection
Set-MpPreference -DisableRealtimeMonitoring 0
Write-Host “Windows Defender real-time protection enabled.”
“`
Control 9: Limitation and Control of Network Ports, Protocols, and Services
Disable unnecessary services and close open ports to reduce your attack surface.
“`powershell
Disable Telnet service
Stop-Service -Name “Telnet” -Force
Set-Service -Name “Telnet” -StartupType Disabled
Write-Host “Telnet service disabled.”
“`
Control 10: Data Recovery Capabilities
Ensure regular backups of critical data and have a recovery plan in place. PowerShell can be used to manage backup schedules.
“`powershell
Check Windows Backup status
wbAdmin get versions
Write-Host “Backup policy check complete.”
“`
Control 13: Data Protection
Encrypt sensitive data both in transit and at rest. BitLocker is a popular option for encrypting system drives.
“`powershell
Enable BitLocker for C drive
Enable-BitLocker -MountPoint “C:” -EncryptionMethod XtsAes128
Write-Host “BitLocker encryption enabled on C drive.”
“`
Control 14: Controlled Access Based on Need to Know
Manage access to sensitive data by setting appropriate file permissions.
“`powershell
Set file access permissions for sensitive data
$acl = Get-Acl “C:\SensitiveData”
$accessRule = New-Object System.Security.AccessControl.FileSystemAccessRule(“DOMAIN\user”, “Read”, “Allow”)
$acl.SetAccessRule($accessRule)
Set-Acl “C:\SensitiveData” $acl
Write-Host “Access control updated for C:\SensitiveData.”
“`
Control 15: Wireless Access Control
Disable wireless adapters on servers or systems where Wi-Fi access is unnecessary.
“`powershell
Disable wireless adapter
Disable-NetAdapter -Name “Wi-Fi”
Write-Host “Wireless adapter disabled.”
“`
Control 16: Account Monitoring and Control
Regularly review user accounts and disable inactive ones to minimize unauthorized access risks.
“`powershell
Disable inactive user accounts
Search-ADAccount -AccountInactive -UsersOnly -TimeSpan 30.00:00:00 | Disable-ADAccount
Write-Host “Inactive accounts disabled.”
“`
Control 17: Security Awareness and Training
While not automatable via script, ensure regular employee training on cybersecurity risks and best practices.
“`powershell
Write-Host “Ensure security awareness training for all employees is scheduled.”
“`
Control 18: Application Software Security
Restrict the execution of unauthorized software using AppLocker or other application control mechanisms.
“`powershell
Create an AppLocker policy
New-AppLockerPolicy -Default -User “Everyone” -XMLPolicy > “C:\AppLockerPolicy.xml”
Write-Host “Application control policy created.”
“`
Conclusion
The CIS Controls offer a comprehensive set of actions that organizations of any size can adopt to enhance their cybersecurity posture. By leveraging PowerShell scripts, you can automate many of these actions, ensuring your organization adheres to the best practices outlined by CIS.
By starting with basic controls, such as inventory management, secure configurations, and privilege auditing, you can significantly reduce your attack surface. As you expand to more advanced controls, such as incident response and account monitoring, you’ll ensure that your organization is well-protected against both common and advanced threats.
Implementing the CIS Controls doesn’t have to be a daunting task, especially with the help of automation tools like PowerShell. By following the steps outlined above, your organization will be on its way to a more secure and
For more Cybersecurity related content Follow: Cyber Point Solution, Youtube